Closed Ural Pie
Main Dishes • Russian
Description
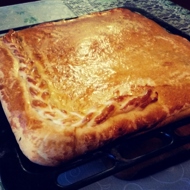
The recipe specifies the amount of ingredients originally given to me in the provided recipe. The specified amount is enough for TWO large baking trays of pie! Depending on taste preferences, the quality of ingredients, and a bunch of other factors, the quantity of products may vary slightly. The pie turns out to be large! No braids are used on the pie; in the photo is one of my variations on this theme. The braids turn out to be a bit dry with this dough. Always have more flour on hand, as the dough may absorb it differently. Additionally, the recipe does not specify dough for dusting the table and rolling pin.
Ingredients
- Whey 0 qt
- Chicken Egg 2 pieces
- Sugar 3 tablespoons
- Salt 2 teaspoons
- Dry yeast 0 oz
- Vegetable Oil 3 tablespoons
- Margarine ½ block
- Wheat Flour 5 lbs
Step-by-Step Guide
Step 1
Combine 1 kilogram of flour and yeast in a separate container. Mix thoroughly.
Step 2
I obtain whey by draining milk and kefir in a 1:1 ratio into a pot and heating it almost to boiling. This results in a lot of whey and delicious cottage cheese, which we strain through cheesecloth. With this dough, you can also make pies.
Step 3
In a deep pot, combine whey, eggs, sugar, salt, vegetable oil, and margarine. Mix everything together.
Step 4
Add flour to the mixture.
Step 5
Thoroughly stir the resulting mass until it becomes homogeneous.
Step 6
Add flour until you reach a consistency where you can pinch the dough, and it falls back, leaving only a small trace. It is convenient to knead in the pot at first, and then, of course, on the table when the dough becomes very elastic.
Step 7
Place the dough in a warm place, covering it with breathable fabric or cheesecloth, for 1-2 hours. Not with a lid! The dough needs to breathe. During the time the dough rises, it should be deflated 2-3 times. My grandmother did this by shaking the container; I do it with my hands. By the time the dough is ready, you should already have the filling prepared.
Step 8
Take a portion of the dough with a wet hand, place it on the flour. Roll out a sheet slightly larger than your baking dish. My grandmother made the dough very thick, i.e., she placed a layer of 1.5 cm at the bottom. In my experience, it rises a lot, so I adjust the thickness as desired.
Step 9
After rolling out the sheet, wrap it around the rolling pin and transfer it to the greased baking tray.
Step 10
Spread the RAW filling. All filling is placed in the pie RAW, except for rice. During baking, the ingredients release juice, and the pie turns out very tender. I really love potatoes, sliced thinly (raw), with mushrooms and sautéed carrots and onions (pre-fried); this is my modification, and I also add a piece of butter to this filling for extra tenderness.
Step 11
Make a second sheet of dough and cover our pie on top.
Step 12
Pinch the edges of the layers or tuck them under. Braids are not used around the edge of such a pie, as it will rise significantly, and the corners will become dry if a large thickness of dough is made in those places.
Step 13
In the original recipe, the surface of the pie is not brushed with egg, just lightly sprinkled with flour.
Step 14
Place the pie in a preheated oven at about 390°F. Baking time depends on the thickness of the pie. We rely on browning. For a thin pie with vegetable filling, 45 minutes is enough; for a pie with fish or thick dough, it may take about two hours.
Cooked This Dish? Share Your Creation!
Snap a photo and let your culinary masterpiece inspire others.
Users Photos
No photos yet. Be the first to share!