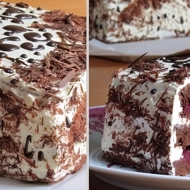
Chocolate Cake with Cherry Filling
Baking and Desserts • Belarusian
Description
Cherry filling — cherries, cherry jam, preserves.
Ingredients
- Baking Powder 2 teaspoons
- Salt ½ teaspoon
- Vanilla salt 2 teaspoons
- Sugar 3⅖ tablespoons
- Farm fresh eggs 5 pieces
- Milk 5 fl oz
- Butter 15 oz
- Instant coffee 2 teaspoons
- 20% Sour Cream 10 oz
- Wheat Flour 2 tablespoons
- Activated Baking Soda ½ teaspoon
- Chili jam 1 jar
Step-by-Step Guide
Step 1
Preheat the oven to 390°F. Melt the butter (or margarine) and let it cool. Beat the eggs and sugar until light and fluffy. Dissolve the coffee in warm milk. Mix all the dry ingredients well (sifted beforehand). Combine the egg-sugar mixture, melted butter, and milk with coffee. Mix everything well. Gradually add the dry ingredients and mix thoroughly. The batter should have the consistency of thick sour cream.
Step 2
Line a baking sheet with parchment paper greased with vegetable oil. Pour the batter and spread it evenly with a spatula. Bake at 390°F for about 20–30 minutes. Adjust the baking time and temperature according to your oven. Check for doneness with a wooden stick — it should come out dry. While the cake cools, prepare the cream.
Step 3
To prepare the cream, mix sour cream, sugar, flour, and egg. Cook the mixture in a water bath, stirring constantly, until thickened. After cooling, it should become a thick mass. In a separate bowl, beat the butter and gradually add the cooled custard mixture, continuing to beat.
Step 4
Assemble the cake. Cut the cooled cake in half, then slice each half horizontally, trimming the edges. You should have four layers. Spread the layers with cherry filling and cream, decorating to your taste and imagination.
Step 5
To prepare the glaze, the proportions are arbitrary (depending on the desired amount of glaze). In a small saucepan, heat the cream (I used 22%) with butter, and break the chocolate into it. Remove from heat and mix well until smooth. Let it cool slightly (the glaze will thicken further). Place it in a parchment paper cone and decorate.
Cooked This Dish? Share Your Creation!
Snap a photo and let your culinary masterpiece inspire others.
Users Photos
No photos yet. Be the first to share!